How to Send Emails from Spring Boot App


Introduction
This article is a step-by-step guide on how to create a landing page that sends a welcome email to subscribers. This will be developed with Java and Spring Boot. It will also show all the required processes for the download of tools and the test for running the web application.
Spring Tools
Starting any application with Spring is a good way to use Spring Tools as it improves the IDEs and brings features to facilitate the codification. This article will be using the Spring Tool 4 for Eclipse on Mac OS. However, it’s also available for Visual Studio Code and Theia, and it can be downloaded from Spring Tools. Choose which one is better for you and download it.
Spring Initializr
Another useful tool for starting a Spring Boot project is the Spring Initializr (start.spring.io), which has a web interface where the configuration of the project can be set up and the dependencies can be chosen. After filling out the form, the project can be downloaded and imported from Spring Tools with the Import Spring Getting Started Content option.
Another way to create a Spring project is using Spring Tools, which provides a feature called Create a New Spring Starter Project. It’s a wizard with the same options available on the web interface.
This article will be using a Gradle Project with Java 15. The dependencies used are:
- Spring Web. Allows running web application on Apache Tomcat and, because of this, the packaging needs to be a War format.
- Java Mail Sender. Include the dependencies for sending emails.
The image below shows the Spring Initializr form filled out to guide you. Note that the Group field represents the project packages and must be filled with com.domain.
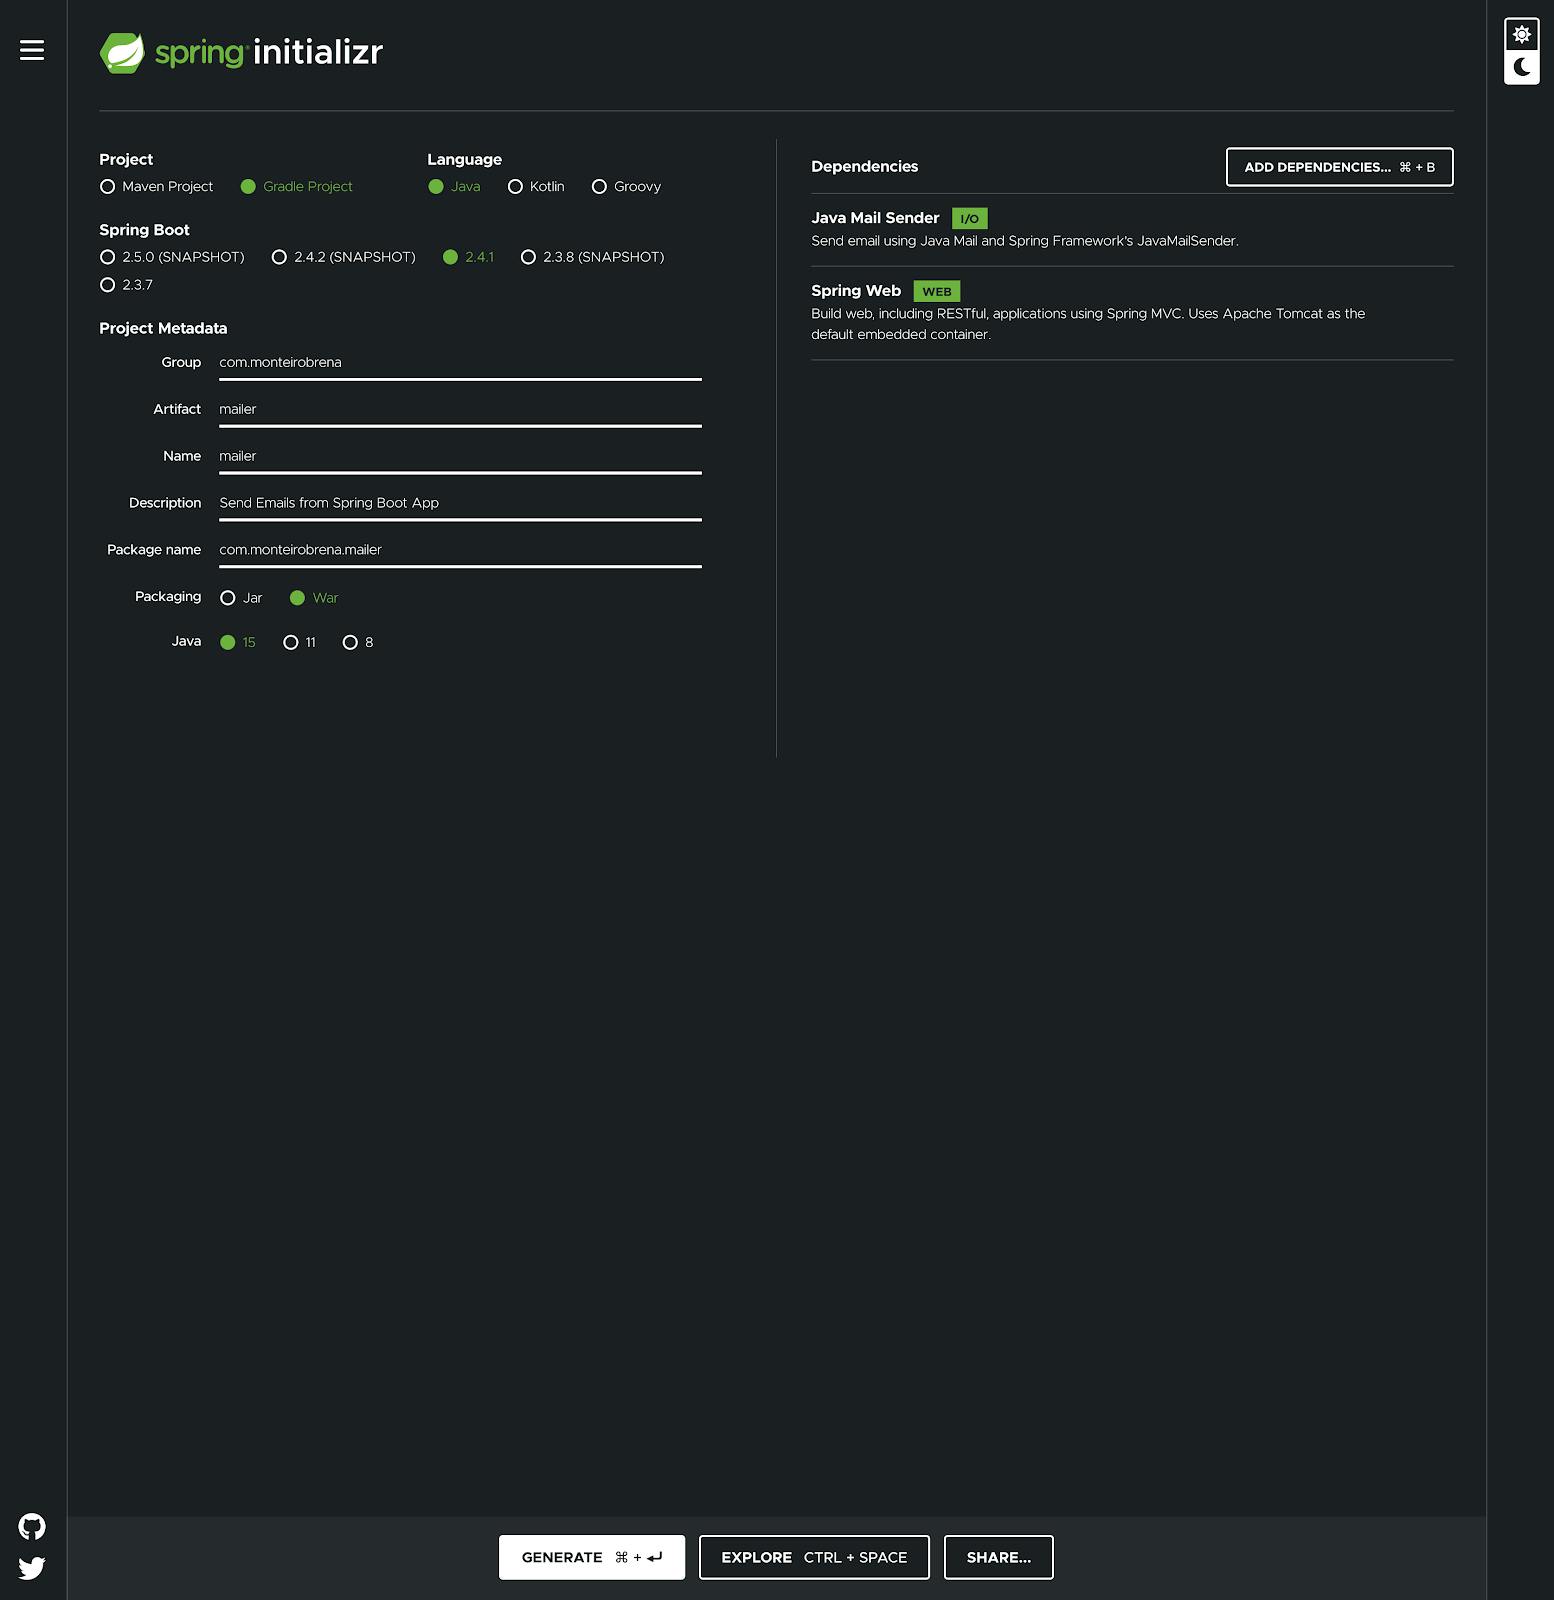
After filling, click on the GENERATE button to download your initialized project. Then, open Spring Tools and click on Import Spring Getting Started Content to open your downloaded project.
If you prefer to do this directly on Spring Tools, click on Create New Spring Starter Project. In the window, the New Spring Starter Project fills the text inputs with the full name and description and chooses the options listed below.
- Type: Gradle
- Packaging: War
- Java Version: 15
- Language: Java
Click on Next and choose the dependencies Spring Web and Java Mail Sender. Now, just click Finish to create your project.
Gradle Configuration
A project created with the wizard on Spring Initializr or on Spring Tools will have the build.gradle file filled with the configurations that the project needs to run. Check if your build.gradle has the Thymeleaf as dependencies, it will be necessary to associate the pages with the model in the next steps.
plugins {
id 'org.springframework.boot' version '2.5.0-SNAPSHOT'
id 'io.spring.dependency-management' version '1.0.10.RELEASE'
        id 'java'
id 'war'
}

group = 'com.domain'
version = '0.0.1'
sourceCompatibility = '15'

repositories {
mavenCentral()
        maven { url 'https://repo.spring.io/milestone' }
        maven { url 'https://repo.spring.io/snapshot' }
}

dependencies {
implementation 'org.springframework.boot:spring-boot-starter-thymeleaf'
        implementation 'org.springframework.boot:spring-boot-starter-mail'
        implementation 'org.springframework.boot:spring-boot-starter-web'
        providedRuntime 'org.springframework.boot:spring-boot-starter-tomcat'
        testImplementation 'org.springframework.boot:spring-boot-starter-test'
}

test {
useJUnitPlatform()
}

springBoot {
mainClassName = 'com.domain.landing.LandingApplication'
}
Creating a Landing Page
In the LandingApplication.java file, we will define the listener on our web application. It is basically a class with a main method and @SpringBootApplication. This class will create the ApplicationContext and launch the web application. Inside the main method, we need to call run from SpringApplication to start it.
// LandingApplication.java
package com.domain.landing;

import org.springframework.boot.SpringApplication;
import org.springframework.boot.autoconfigure.SpringBootApplication;

@SpringBootApplication
public class LandingApplication {
    public static void main(String[] args) {
        SpringApplication.run(LandingApplication.class, args);
    }
}
Model Structure
The class model will be used to store the name and email used in the form. These pieces of information will navigate across the controller and mailer. We need to create a new package to put the model in. Usually, the package will have the model and the controller separating the code by subjects. Following this package structure helps the Spring Boot to scan and find the classes. Another way is to separate a package for models and another for controllers – this is also a valid approach.
// SubscribeForm.java
package com.domain.landing.subscribe;

public class SubscribeForm {
    private String name;
    private String email;

    public String getName() {
        return this.name;
    }

    public void setName(String name) {
        this.name = name;
    }

    public String getEmail() {
        return this.email;
    }

    public void setEmail(String name) {
        this.email = name;
    }
}
Controller and Requests
The first version of our controller implements two routes: GET and POST methods. A method called showForm will receive a subscribe object and mapping to render the form page. This page will have a form with fields for name and email, and also a Submit button. This submits our second method submitForm, which also receives the subscribing object as a parameter. For now, this method will only redirect to the successful subscribe page.
It’s important to highlight that the addViewControllers method is necessary for registering the view that will be used for redirection with the POST method.
// SubscribeController.java
package com.domain.landing.subscribe;

import org.springframework.stereotype.Controller;
import org.springframework.web.bind.annotation.GetMapping;
import org.springframework.web.bind.annotation.PostMapping;
import org.springframework.web.servlet.config.annotation.ViewControllerRegistry;
import org.springframework.web.servlet.config.annotation.WebMvcConfigurer;

@Controller
public class SubscribeController implements WebMvcConfigurer {

@Override
public void addViewControllers(ViewControllerRegistry registry) {
registry.addViewController("/subscribe/confirmation").setViewName("subscribe/confirmation");
}

@GetMapping("/")
public String showForm(SubscribeForm subscribeForm) {
return "/subscribe/form";
}

@PostMapping("/")
public String submitForm(SubscribeForm subscribeForm) {
return "redirect:/subscribe/confirmation";
}
}
Views Files
In the src/main/resources/templates package, we’ll create a package called Subscribe to store our HTML files for our views and pages. The form.html file will contain the form and will be the page shown when accessed.
Note that the object has to be the same name as your parameter on the submitForm and the action must be the same as defined on PostMapping.
// src/main/resources/templates/subscribe/form.html
<!DOCTYPE html>
<html>
<head>
<meta charset="UTF-8">
    <title>Subscribe on newsletter</title>
</head>
<body>
        <h1>Subscribe on newsletter</h1>
        <form action="#" th:action="@{/}" th:object="${subscribeForm}" method="post">
                    <table>
                    <tr>
                            <td>Name:</td>
                    <td><input type="text" th:field="*{name}" /></td>
                    </tr>
                    <tr>
                    <td>Email:</td>
                        <td><input type="text" th:field="*{email}" /></td>
                    </tr>
                <tr>
                            <td><button type="submit">Subscribe</button></td>
                    </tr>
            </table>
            </form>
</body>
</html>
The confirmation.html file has only a message informing us that everything works. This will be shown after submitting the form.
// confirmation.html
<!DOCTYPE html>
<html>
<head>
<meta charset="UTF-8">
<title>Subscribe on newsletter</title>
</head>
<body>
<h1>Successfully subscribed!</h1>
<h2>You will receive an email confirming your subscription.</h2>
</body>
</html>
Testing so Far Start your application by clicking on the Run button, or open a terminal, go to the project directory, run ./gradlew bootRun on the terminal, and access the URL localhost:8080 – it’ll show a page similar to the image below.
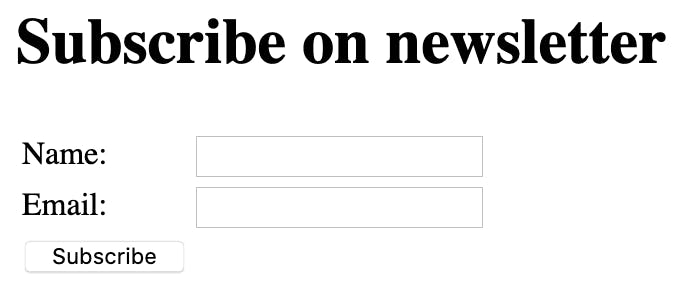
Fill out the form and click on the Subscribe button to see the redirect in action and the confirmation page.

If you see this, you can move forward, so let’s implement the sending email.
Sending Emails to Mailtrap Testing Environment
To test our sending emails, we’ll use Mailtrap. Mailtrap is a service for inspecting the email content received before sending it in production. Mailtrap is free for personal side projects, so we can send 500 emails per month and test our application in development and even staging environments.
To start using Mailtrap access https://mailtrap.io/ home page, create your account, and log in to it.
On the sidebar, access the Testing > Inboxes menu. In the shows Projects panel, click on Add Inbox.

Fill the Inbox name field with a meaningful name, such as Subscribers, and then click on the Save button.

Now click on Subscribers to access the configuration page.

Click on Show Credentials to see the SMTP information required to send the email. This information will be added to the Properties in our Mail class.
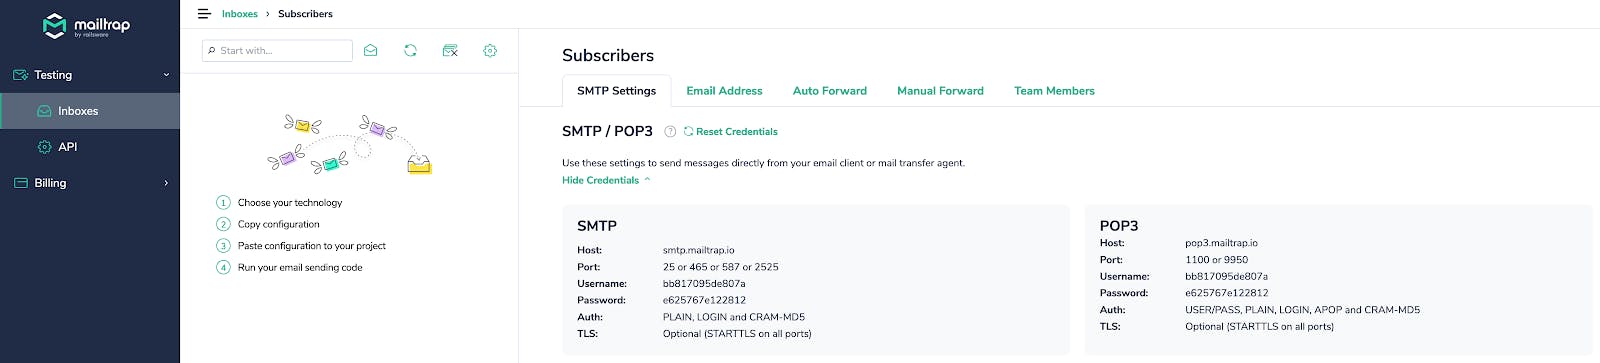
We also need to get the email used as the sender. To get this, click on the Email Address tab and copy the Inbox Email Address.

Create a new package called Mailer and a new class called Mail. In this class, create constants to store the configuration that you got from Mailtrap. The setProperties method assigns the constants to the Properties object that will be used to create a session authentication with Mailtrap credentials.
The send method creates a message with email fields such as from, recipient, subject, content, and date. The send method of Transport class is responsible for sending the message to Mailtrap inbox.
// Mail.java
package com.domain.landing.mailer;

import java.io.IOException;
import java.util.Date;
import java.util.Properties;

import javax.mail.Message;
import javax.mail.MessagingException;
import javax.mail.PasswordAuthentication;
import javax.mail.Session;
import javax.mail.Transport;
import javax.mail.internet.AddressException;
import javax.mail.internet.InternetAddress;
import javax.mail.internet.MimeMessage;

import com.domain.landing.subscribe.SubscribeForm;

public class Mail {
        private final String PORT = "587";
        private final String HOST = "smtp.mailtrap.io";
        private final String USERNAME = "bb817095de807a";
        private final String PASSWORD = "e625767e122812";
        private final String EMAIL = "0b5d29e626-65f490@inbox.mailtrap.io";

        private final boolean AUTH = true;
        private final boolean STARTTLS = true;

        public void send(SubscribeForm subscriber) throws AddressException, MessagingException, IOException {
Message msg = new MimeMessage(setSession(setProperties()));

        msg.setSentDate(new Date());
            msg.setSubject("You're subscribed on newsletter");

msg.setFrom(new InternetAddress(EMAIL, false));
        msg.setRecipients(Message.RecipientType.TO, InternetAddress.parse(subscriber.getEmail()));

        msg.setContent(subscriber.getName().concat(", you're very welcome here!"), "text/html");

Transport.send(msg);
    }

private Session setSession(Properties props) {
           Session session = Session.getInstance(props, new javax.mail.Authenticator() {
                protected PasswordAuthentication getPasswordAuthentication() {
                    return new PasswordAuthentication(USERNAME, PASSWORD);
                }
});
           return session;
}

private Properties setProperties() {
           Properties props = new Properties();

       props.put("mail.smtp.port", PORT);
            props.put("mail.smtp.host", HOST);
       props.put("mail.smtp.auth", AUTH);
            props.put("mail.smtp.starttls.enable", STARTTLS);

        return props;
}
}
With Mail class created, we need to call the send method when the form was submitted. To do this, create a new instance from Mail in the submitForm method on SubscribeController. This instance will call the send method to pass the subscribe as a parameter. This parameter contains the email and name used to mount the email that will be sent. It’ll throw AddressException, MessagingException and IOException exceptions, and will also need to import these packages.
// SubscribeController.java
...
import com.domain.landing.mailer.Mail;

import java.io.IOException;

import javax.mail.MessagingException;
import javax.mail.internet.AddressException;
...

@Controller
public class SubscribeController implements WebMvcConfigurer {
...
@PostMapping("/")
        public String submitForm(SubscribeForm subscribeForm) throws AddressException, MessagingException, IOException {
Mail mailer = new Mail();
mailer.send(subscribeForm);
return "redirect:/subscribe/confirmation";
    }
}
Run the application again, access localhost:8080, fill the form and click on the Subscribe button. Go back to Mailtrap and access Inboxes > Subscribers to see the received email.

Sending Emails with Attachments
Now let’s try sending emails with attachments. Add an image to src/main/resources/static. In my case, I used an image called fine.jpeg.
We need to change the content of the email body to work with multipart to add the message and the attachment. The multipart instance will be initialized on the Mail constructor and will be accessed by the receiver. Two new methods were created: the setMessage to include the multipart as content and the setAttachment to attach the file. After adding this body’s parties to multipart, we can set the multipart as the content of the MimeMessage instance.
...
import java.io.File;
...

import javax.mail.Multipart;
import javax.mail.internet.MimeBodyPart;
import javax.mail.internet.MimeMultipart;
...

public class Mail {
    ...
private Multipart multipart;

public Mail() {
this.multipart = new MimeMultipart();
}

private Multipart getMultipart() {
        return multipart;
}

public void send(SubscribeForm subscriber) throws AddressException, MessagingException, IOException {
Message msg = new MimeMessage(setSession(setProperties()));

        setAttachment();
            setMessage(subscriber);

            msg.setContent(getMultipart());
            msg.setSentDate(new Date());
            msg.setSubject("You're subscribed on newsletter");

            msg.setFrom(new InternetAddress(EMAIL, false));
            msg.setRecipients(Message.RecipientType.TO, InternetAddress.parse(subscriber.getEmail()));

Transport.send(msg);
}

private void setMessage(SubscribeForm subscriber) throws MessagingException {
MimeBodyPart message =  new MimeBodyPart();

message.setContent(subscriber.getName().concat(", you're very welcome here!"), "text/html");

           getMultipart().addBodyPart(message);
}

private void setAttachment() throws MessagingException, IOException {
           MimeBodyPart attachment = new MimeBodyPart();

attachment.attachFile(new File("src/main/resources/static/fine.jpeg").getCanonicalPath());

           getMultipart().addBodyPart(attachment);
}
    ...
}
Re-run the application, access localhost:8080, fill out the form, and click on the Subscribe button. Go back to Mailtrap and access Inboxes > Subscribers to view the received email with the attachment. You can download it to check whether the image arrived without any issues.

Sending HTML Email When we set the content, we can parse the type of our content. In the example above, we are already parsing text/html as a type. Using this configuration, we can parse any HTML code inside a string and send the email with HTML formatting. Something like this will work and send a formatted email.
...
public Mail() {
...
private void setMessage(SubscribeForm subscriber) throws MessagingException {
           MimeBodyPart message =  new MimeBodyPart();

       String content = "<h1>" + subscriber.getName() + "</h1><br />";
       message.setContent(content + ", you're very welcome here!", "text/html");

           getMultipart().addBodyPart(message);
        }
...
}
But we can improve it using StringBuffer to create a string with all the content.
...
public Mail() {
…
private void setMessage(SubscribeForm subscriber) throws MessagingException {
           MimeBodyPart message =  new MimeBodyPart();

       StringBuffer htmlContent = new StringBuffer();
               htmlContent.append("<html><head><style>");
             htmlContent.append("body { background-color: #f2f2f2; }");
            htmlContent.append("h1 { color: #333; }");
            htmlContent.append("</style></head><body><h1>");
            htmlContent.append(subscriber.getName());
            htmlContent.append(", you're very welcome here!");
            htmlContent.append("</h1><br /></body></html>");

message.setContent(htmlContent.toString(), "text/html");

       getMultipart().addBodyPart(message);
}
...
}
Another more sophisticated option is to use some templates for our email and pass the variable as a parameter to the HTML file. Some options that work well with Spring Boot are Thymeleaf and FreeMaker.
One more time, run the application, access localhost:8080, fill out the form, and click on the Subscribe button. Go back to Mailtrap and access Inboxes > Subscribers to see the received email with HTML and CSS formatting.

Click on the HTML Source tab to see the generated HTML.

Another awesome feature of Mailtrap is showing whether the HTML and CSS in our email are valid in the email clients. Click on the Check HTML tab to verify the errors.

Conclusion
There are other ways to send an email with Spring Boot. With fewer changes, we can, for example, move the authentication constants from Mail class to the application.properties. We can also use some templates to improve the HTML emails. It’s important to see other possibilities to refactor and grow our code. Did you see something to improve here? Let’s talk!
Thanks for reading our tutorial on how to send HTML email using Java Spring, which was originally published in the Mailtrap Blog by Brena Monteiro.